IDEA导入JDBC的jar包

1. JDBC基本概念

  • 概念:Java Database Connectivity ,Java语言操作数据库

1.1 本质

定义了所有操作所有关系型数据库的规则(接口),各个数据库厂商实现接口实现数据库驱动jar包。我们可以使用这套接口(JDBC)编程,真正执行的代码是驱动jar包中的实现类。

简单理解:假如现在有一个Person接口,其中有一个方法eat,Worker实现类继承这个接口。Person p = new Worker(); p.eat(); 这里执行的是Worker中实现了的方法。JDBC也是类似,编程时用接口类型调用方法,真正执行的是导入的jar包中实现类对应的实现方法。

2. IDEA导入JDBC的jar包–方法一

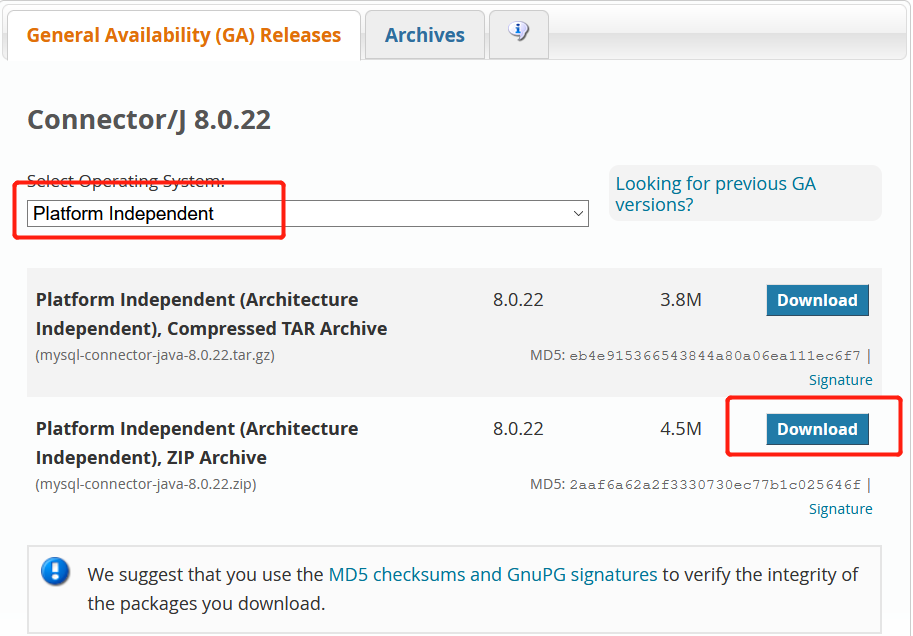
  • 下载对应MySQL厂商的驱动jar包:https://dev.mysql.com/downloads/connector/j/

    Select Operating System:Platfrom Independent
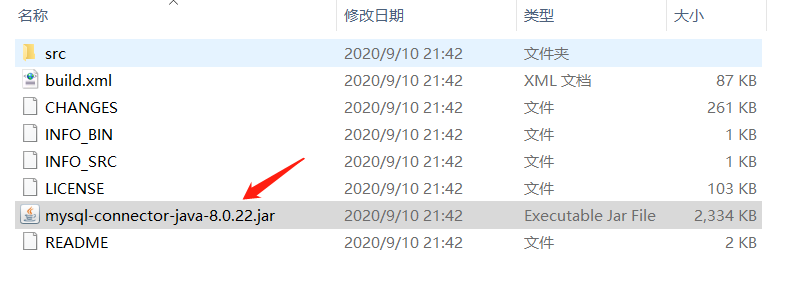
  • 找到mysql-connector-java-8.0.22.jar

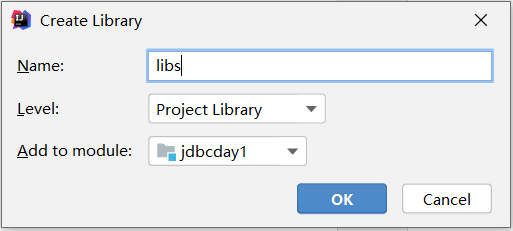
  • 为方便管理,先将jar包复制到项目下面的libs目录下,然后右键libs点击Add as Library
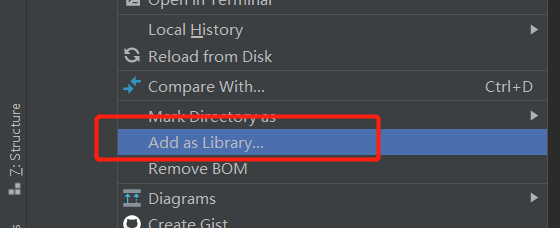
![](https://reborn-photo-url.oss-cn-beijing.aliyuncs.com/oss:/hxx_photo/add as liabrary.png)

  • Level选择Project Liabrary或者Module Liabrary

![](https://reborn-photo-url.oss-cn-beijing.aliyuncs.com/oss:/hxx_photo/add as liabrary2.png)

IDEA导入JDBC的jar包–方法二

  • 点击file –>project structure
  • 选择Modules–>Dependencies–> + –>JARs or Directories…

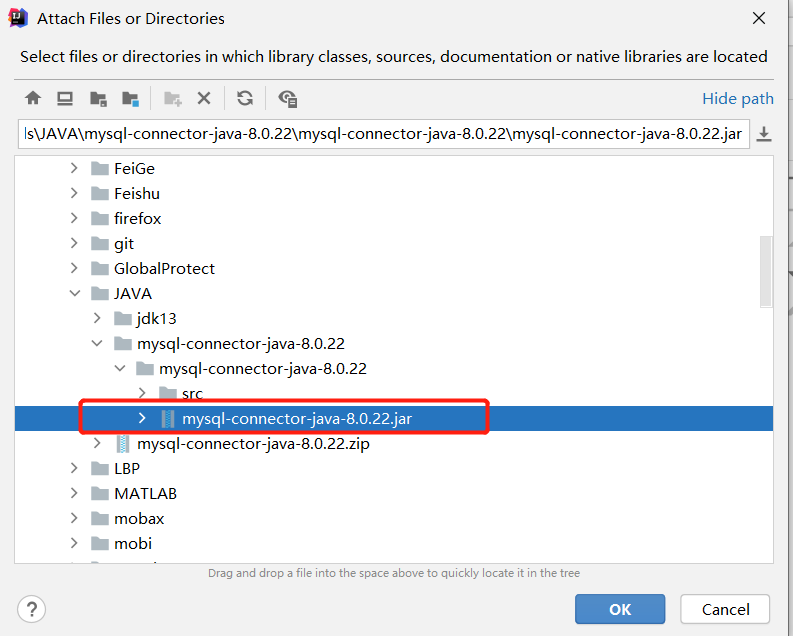
  • 选择jar包,点击OK

  • 继续选择jar包,点击OK

  • 在External Libraries中可以看到jar包

navicat连接的文件目录

建立连接时高级选项中的设置位置

  • 这个设置位置所填写的文件夹路径表示本次数据库连接中编写的查询文件等所在的位置

  • 本次连接所建立的数据库有test和test_file,上面所设置的目录文件中会包含这两个文件,test和test_file文件中存放的是本次连接下的查询sql、备份备份文件,不包含表。

编辑链接中的日志文件

  • 在【工具栏】中选择【选项】中的【文件位置】可以自定义日志位置

navicat备份数据库

自定义备份保存位置

  • 右键连接—>点击编辑连接—>确认关闭连接
  • 在高级选项中选择文件夹

使用navicat备份

  • 点击数据库下的备份,新建备份
  • 还原数据库之前最好将原数据库删除,然后点击还原备份
  • 这种方式只会备份表和数据,不会备份查询和报表。在还原时可以将之前的sql存放在备份文件所在的文件夹中,会一并还原

SQL转储

  • 右键数据库,选择转储数据库,定义文件开始备份
  • 还原备份,选择运行sql文件

命令行备份

  • 备份:mysqldump -u用户名 -p密码 数据库名 > 保存的路径
  • 还原:
    • 登录数据库
    • 创建数据库
    • 使用数据库
    • 执行文件 source文件路径
1
2
3
4
5
6
mysqldump -uroot -proot  test > a.sql;-- 自定义sql文件路径
mysql -uroot -p;
drop database test;
create database test;
use test;
source a.sql;

sql和navicat基础编程

1. SQL 分类

  1. DDL:数据定义语言,用来定义数据库对象:数据库、表。
  2. DML:数据操作语言,对数据库中表的数据进行增删改
  3. DQL:数据查询语言,用来查询数据库中表的记录
  4. DCL:数据控制语言,用来定义数据库的访问权限和安全级别,及创建用户

2. DDL:操作数据库、表

2.1 操作数据库:CRUD

  • create:创建

    1
    2
    3
    #create database if not exists 数据库名;
    #create database 数据库名 character set 编码格式;
    mysql> create database if not exists db1 character set gbk;
  • Retrieve:查询

    • show databases;
    • show create database 数据库名;
  • Delete:删除

    • drop database if exist 数据库名;
  • update:修改

    • 修改数据库的字符集

      alter database 数据库名 character set 编码格式;

  • 使用数据库

    • 查询当前正在使用的数据库名称

      select database();

2.2 操作表

  • 创建

    create tables 表名(

    ​ 列名 数据类型1,

    ​ 列名 数据类型2

    );

  • 数据类型

    int :整数类型

    double:小数类型

    date:只包含年月日yyyy-MM-dd

    datetime:包含年月日时分秒:yyyy-MM-dd HH:mm:ss

    timestamp:时间戳,如果不给字段赋值,则系统将自动赋值当前的系统时间。且要设置默认值

    alter table 表名 MODIFY 列名 TIMESTAMP not null DEFAULT CURRENT_TIMESTAMP; # 这里是修改的时候设置的默认值CURRENT_TIMESTAMP

    varchar:字符串

  • 查询

    • 查询某个数据库中所有的表名称

      show tables;

    • 查看表结构

      desc 表名;

  • 更新

    • 修改表名

      alter table 表名 rename to 新表名

    • 修改表的字符集

      • 查看表的字符信息

        show create table 表名;

      • 修改

        alter table character set 字符集;

    • 添加一列

      alter table 表名 add gender varchar(10);

    • 修改列名称 类型

      alter table 表名 modify 列名 新类型; 只改类型

      alter table 表名 change 旧列名 新列名 新类型;

    • 删除列

      alter table 表名 drop 列名;

  • 删除

    drop table if exists 表名;

  • 复制表

    create table 表名 like 被复制的表名;

3.DML:增删改表中数据

  • 添加数据

    insert into 表名(列名1,.......,列名n) values(值1,......值n);

    insert into 表名 values(值1,......值n); # 需要为每一列都添加值

  • 删除数据

    delete from 表名 [where 条件];

    删除表中所有记录

    • truncate table 表名; # 删除表,然后再创建一样S的空表
    • delete from 表名; # 不推荐使用,因为是有多少条记录执行多少次删除
  • 修改数据

    update 表名 set 列名1=值1,.....,列名n=值n [where 条件];

    不加where将会把表中该列所有的数据修改

4.DQL:查询语句

  • 基础查询

    1
    2
    3
    4
    5
    6
    7
    8
    9
    10
    11
    12
    /*
    select 字段列表
    from 表名列表
    where 条件列表
    group by 分组字段
    having 分组之后的操作
    order by 排序
    limit 分页限定
    */
    -- 计算英语和数学总数
    select test_name,math,english,IFNULL(math,0)+IFNULL(english,0) 总分 from student;
    select * from student where test_name like '祁%';
  • 条件查询

    运算符:

    • < <= > >= = <> !=

    • BETWEEN…AND

    • IN(集合)

    • LIKE 模糊查询

      • 占位符

        _ (下划线):单个任意字符

        %: 任意多个字符

    • IS NULL

    • and 或者&&

    • or 或者||

    • not 或者 !

  • 排序查询:升序:ASC(默认),降序:DESC

    1
    2
    -- order by 排序字段1 排序方式1,排序字段2 排序方式2...
    select *from student ORDER BY math ASC,english ASC;
  • 聚合函数:count、max、min、sum、avg

    1
    2
    3
    4
    5
    6
    7
    8
    9
    10
    11
    12
    13
    14
    15
    -- select count(列名) from 表名;  -- 排除了空值得出的记录个数
    -- count
    select count(math) from student; -- 得出有几条记录,排除空数据
    select count(IFNULL(english,0)) from student; -- 如果存在null值则将其换为0,原表不会改动
    select count(*) from student; -- 只要这一行有一个不为null就算一个记录,但不推荐使用
    select count(test_id) from student; -- 推荐参数选择主键
    -- max
    select max(math) from student;
    select min(math) from student;

    -- sum
    select sum(math) from student;

    -- avg
    select avg(math) from student;
  • 分组查询:分组之后查询的字段:分组字段、聚合函数

    1
    2
    3
    4
    5
    6
    7
    -- group by 分组字段
    -- 按照性别分组,分别查询男女的平均分
    select sex,avg(math) math_avg,avg(english)math_english,count(test_id) from student group by sex;
    select english,count(english) from student group by english;
    -- 英语分数大于80才参与分组,且只计算组内记录数目大于1的数据
    -- 给count(test_id)命名为人数,在having中可以直接使用人数代替count(test_id)
    select sex,count(test_id) 人数,avg(english) english_avg from student where english>= 80 group by sex HAVING 人数>1;

    where和having的区别:

    • where在分组之前进行限定,如果不满足条件,则不参与分组;having在分组之后进行限定,如果不满足条件,则不会被查询出来。
    • where后不可以跟聚合函数,而having可以进行聚合函数的判断。
  • 分页查询

    MySQL下:limit 开始的索引,每页查询的条数

    1
    2
    3
    -- 每页显示两条记录
    -- 开始索引=(当前的页码 - 1) * 每页显示的条数
    select * from student limit 2,2;

5.约束

  • 主键约束:primary key

  • 非空约束:not null

  • 唯一约束:unique

    1
    2
    3
    4
    5
    6
    7
    8
    9
    10
    11
    12
    13
    14
    15
    16
    17
    18
    19
    20
    21
    create table stu(
    id INT primary key auto_increment, -- 主键约束,自动增长
    stu_name varchar(20) not null, -- 非空
    stu_phone varchar(13) unique -- 唯一约束/唯一索引
    );
    -- 删除非空约束
    alter table stu modify stu_name varchar(20);
    -- 创建完表后添加非空约束
    alter table stu modify stu_name varchar(20) not null default "";

    -- mysql中唯一约束限定的列的值可以有多个null
    -- 删除唯一约束
    alter table stu drop index stu_phone;
    -- 创建表后添加唯一约束
    alter table stu modify stu_phone varchar(13) unique;

    -- 删除主键
    alter table stu drop primary key;
    -- 创建完表后添加主键
    alter table stu modify id int primary key;
    alter table stu add primary key(id);
  • 外键约束:foreign key

    • 创建表时添加外键

    • 删除外键

    • 创建表之后添加外键

    • 级联操作 on update cascade on delete cascade

      级联删除\级联更新:restrict、cascade、set null、no action

    1
    2
    3
    4
    5
    6
    7
    -- 拆分为两张表 emp和department
    -- constraint 外键名称 foreign key 外键列字段名称 references 主表名称(主表列名称)
    -- 删除外键
    -- alter table 表名 drop foreign key 外键名称(注意不是外键那个字段名称)
    alter table emp drop foreign key emp_dep_id;
    -- 创建表之后增加外键
    alter table emp add constraint emp_dep_id foreign key (dep_id) references department(dep_id);

6.设计数据库

  1. 多表之间的关系

    • 一对一:

      • 一个人只有一个身份证

      • 实现方式:可以任意一方添加唯一外键指向另一方的主键

    • 一对多

      • 一个部门有多个员工,一个员工只能对应一个部门
      • 实现方式:在多的一方建立外键,指向一的一方的主键。
    • 多对多

      • 一个学生可以选择多门课程,一门课程可以被多个学生选择
      • 实现方式:多对多关系中实现需要借助第三张中间表。中间表至少包含两个字段,这两个字段作为第三张表的外键,分别指向两张表的主键。
  2. 数据库设计的范式

7. 多表查询

  • department表
dep_id dep_name dep_location
1 研发部 广州
2 销售部 深圳
  • emp表
id name age dep_id salary
1 张三 21 1 25
2 王五 21 2 20
  • 内连接

    1
    2
    3
    4
    5
    6
    7
    8
    9
    10
    11
    12
    -- 隐式内连接
    select
    t1.name,
    t2.dep_name
    from
    emp t1,
    department t2
    where
    t1.dep_id = t2.dep_id;
    -- 显示内连接
    -- select 字段列表 from 表名1 inner join 表名2 on 条件;
    select emp.`name`,department.dep_name from emp INNER JOIN department on emp.dep_id = department.dep_id;
  • 外连接

    1
    2
    3
    4
    -- 查询所有员工信息,如果员工有部门,则查询部门名称,没有部门则不显示
    -- 左连接查询
    -- select 字段列表 from 表1 LEFT JOIN 表2 on 条件;
    select emp.*,department.dep_name from emp LEFT JOIN department on emp.dep_id = department.dep_id;
  • 子查询

    1
    2
    3
    4
    5
    6
    7
    8
    9
    10
    11
    12
    13
    14
    15
    16
    17
    18
    19
    20
    21
    22
    23
    -- 子查询的结果是单行单列
    -- 子查询可以作为条件,使用运算符做判断
    -- 1.查询员工工资小于平均工资的人
    select emp.* from emp where emp.salary < (select avg(emp.salary) from emp);

    -- 子查询的结果是多行单列,使用运算符in
    -- 2.查询财务部和销售部所有的员工信息
    select emp.* from emp where emp.dep_id in (select department.dep_id from department where dep_name = "研发部" or dep_name = "销售部");

    -- 子查询的结果是多行多列,子查询可以作为一张虚拟表
    -- 3.查询员工工资大于15的员工信息和部门信息
    select emp.*,department.dep_name from emp,department where emp.salary > 15 and department.dep_id = emp.dep_id;


    -- 将下面这个查询的结果当作一个新表
    -- select emp.* from emp where emp.salary > 15;

    select t2.*,t1.dep_name,t1.dep_location
    from
    department t1,
    (select emp.* from emp where emp.salary > 15) t2
    where
    t1.dep_id = t2.dep_id;

8.事务

  1. 事务的概念

    如果一个包含多个步骤的业务操作,被事务管理,那么这些操作要么同时成功,要么同时失败。在MySQL中执行一条DML语句默认提交一次事务,而Oracle默认手动提交事务。

    • Mysql事务的默认提交方式
    1
    2
    select @@autocommit;-- 1代表自动提交,0代表手动提交
    set @@autocommit = 0;
  2. 操作

    开始事务:start transaction

    回滚:rollback

    提交:commit

    1
    2
    3
    4
    5
    6
    7
    start TRANSACTION;
    update emp set salary = salary-10 where id=2;
    update emp set salary = salary+10 where id=3;
    -- 如果没有出错就提交
    commit;
    -- 如果出错回滚
    rollback;
  3. 事务的四大特征

    • 原子性
    • 持久性
    • 隔离性:多个事务之间
    • 一致性:前后操作之后数据总量不变
  4. 事务的隔离级别

    多个事务之间是隔离的、相互独立的。但是如果多个事务操作同一批数据,则会引发一些问题,设置不同的隔离级别就可以解决这些问题

    • 存在问题

      • 脏读:一个事务读取到另一个事务中没有提交的数据
      • 不可重复读:在同一个事务中两次读取到的数据不一样
      • 幻读:一个事务操作(DML)数据表中所有记录,另一个事务添加了一条数据,则第一个事务查询不到自己的修改
    • 隔离级别:隔离级别从小到大安全性越来越高,但是效率越来越低

      • read uncommitted:读未提交
        • 会产生的问题:脏读、不可重复读、幻读
      • read committed:读已提交(Oracle默认)
        • 会产生的问题:不可重复读、幻读
      • repeatable read:可重复读(Mysql默认)
        • 会产生的问题:幻读
      • serializable:串行化
    • 数据库查询隔离级别

      1
      2
      select @@transaction_isolation;
      show global variables like '%isolation%';
    • 数据库设置隔离界别

      1
      set global transaction_isolation ='REPEATABLE-READ';

9.DCL管理用户、授权

  1. 管理用户

    • 添加用户

    • 删除用户

    • 修改用户密码

    • 查询用户

      1
      2
      3
      4
      5
      6
      7
      8
      9
      10
      11
      12
      13
      -- 切换数据库 mysql
      use mysql;
      select * from user;
      -- 创建用户
      -- create user '用户名'@'主机名' identified by '密码';
      -- 主机名为%时表示任意电脑上该用户都可访问本数据库
      -- 创建用户
      create user 'hxx'@'localhost' identified by '123456';
      -- 删除用户
      drop user 'hxx'@'localhost';
      -- 修改用户密码
      -- ALTER USER 'test'@'localhost' IDENTIFIED WITH MYSQL_NATIVE_PASSWORD BY '新密码';
      ALTER USER 'hxx'@'localhost' IDENTIFIED WITH MYSQL_NATIVE_PASSWORD BY '147852';
  2. 权限管理

    • 查询权限、授予权限、撤销权限

      1
      2
      3
      4
      5
      6
      7
      8
      9
      10
      -- 查询权限
      show grants for '用户名'@'主机名';

      -- 授予权限
      -- grant 权限列表 on 数据库名.表名 to '用户名'@'主机名';
      grant select on test.stu to 'hxx'@'localhost';
      grant all on *.* to 'hxx'@'localhost';

      -- revoke 权限列表 on 数据库名.表名 from '用户名'@'主机名';
      revoke all on *.* from 'hxx'@'localhost';

SQLyong或navicat客户端连接MySQL失败

SQLyong/Navicat 连接 Mysql 8.0.11 出现1251- Client does not support authentication protocol 错误

mysql8 之前的版本中加密规则是mysql_native_password,而在mysql8之后,加密规则是caching_sha2_password, 客户端版本低的话加密规则和mysql8的加密规则不一样,因此会连接失败。

解决办法

  1. 升级SQLyong/navicat客户端版本(推荐)

  2. 修改MySQL加密规则(不推荐,如果暂时连接一下,可以先修改为mysql_native_password,然后复原为caching_sha2_password)

    • 执行语句
    1
    2
    3
    ALTER USER 'root'@'localhost' IDENTIFIED WITH mysql_native_password BY '123456';
    FLUSH PRIVILEGES;
    # ALTER USER 'root'@'localhost' IDENTIFIED WITH caching_sha2_password BY '123456';

MySQL安装启动以及登录退出

MySQL安装

MySQL修改用户密码

  • ALTER USER ‘用户名‘@’localhost’ IDENTIFIED BY ‘密码’

MySQL启动

  • 命令行

    启动:net start mysql

    关闭:net stop mysql

MySQL登录

  • 登录

    • 本地登录:mysql -u[用户名] -p[密码]
    • IP登录:mysql -h[IP地址] -u[用户名] -p[密码]
  • 退出:exit 或者 quit

MySQL目录结构

  1. MySQL安装目录
  2. MySQL数据目录

java注解

注解

  • 作用
    编写文档:通过代码里标识的元数据生成文档【生成文档doc文档】 javadoc

    代码分析:通过代码里标识的元数据对代码进行分析【使用反射】

    编译检查:通过代码里标识的元数据让编译器能够实现基本的编译检查【Override】

JDK预定义的注解

  • @Override:检测被该注解标注的方法是否继承自父类(接口)
  • @Oeprecated:将该注解标注的内容,已过时
  • @SuppressWarnings:压制警告
1
2
3
4
5
6
7
8
9
10
11
12
13
14
15
@SuppressWarnings("all")  //压制警告,关于AnnoDemo的所有代码警告都不显示
public class AnnoDemo {
@Override
public String toString() {
return super.toString();
}
@Deprecated
public void show1(){
//有缺陷的方法,已过时
}
public void show2(){
//调用show1
show1();
}
}

自定义注解

  • 格式

    元注解 public @interface 注解名称{ 属性列表 }

1
2
public @interface MyAnno {
}
  • 注解的本质上就是一个接口,默认继承java.lang.annotation.Annotation
1
2
3
4
5
E:\JAVA\javase\study1\src\hxx\Annotation>javac MyAnno.java
E:\JAVA\javase\study1\src\hxx\Annotation>javap MyAnno.class
Compiled from "MyAnno.java"
public interface hxx.Annotation.MyAnno extends java.lang.annotation.Annotation {
}
  • 属性:接口中的抽象方法

    1. 属性的返回值类型:

      • 基本数据类型
      • String
      • 枚举
      • 注解
      • 以上类型的数组
    2. 定义了属性,在使用时需要给属性赋值

      • 如果定义了属性时,使用default关键字给属性默认初始化值,则使用注解时,可以不进行属性的赋值
      • 如果只有一个属性需要赋值,并且属性的名称是value,则value可以省略,直接定义值即可
      • 数组赋值时,使用{}包裹。如果数组中只有一个值,则{}可以省略
1
2
3
4
5
6
7
8
9
10
11
public @interface MyAnno {
//int value();
int show1();
String name() default "hxx"; //默认值
Person per(); //枚举
MyAnno2 anno(); // 注解
String[] strs(); // 字符数组
}
@MyAnno(show1 = 1,name = "qzy",per = Person.p2,anno = @MyAnno2,strs = {"hxx","qzy"})
public class Worker {
}
  • 元注解:描述注解的注解

    @Target :描述注解能够作用的位置

    • ElementType取值:
      • TYPE:可以作用于类上
      • METHOD:可以作用于方法上
      • FIELD:可以作用域成员变量上
      • ……..

    @Retention:描述注解被保留的阶段

    • RetentionPolicy取值
      • RUNTIME:运行时(一般自定义的注解使用),当前被描述的注解,会保留到class字节码文件中,并被JVM读取到
      • SOURCE:
      • CLASS:

    @Document:描述注解是否被抽取到api文档中

    @Inherited:描述注解是否被子类注解

解析注解

  • 获取注解中定义的属性值

案例1:不修改代码,执行指定类的指定方法

  1. 在注解中进行配置
1
2
3
4
5
6
@Target(ElementType.TYPE)//可用于类
@Retention(RetentionPolicy.RUNTIME)
public @interface Pro {
String classname ();
String method();
}
  1. 在测试中解析注解
1
2
3
4
5
6
7
8
9
10
11
12
13
14
15
16
17
18
19
20
21
22
23
24
25
26
27
28
29
30
31
32
@Pro(classname = "hxx.Annotation.Worker",method = "show")
public class ReflectTest {
public static void main(String[] args) throws Exception {
// 解析注释
//获取该类的字节码文件对象
Class<ReflectTest> reflectTestClass = ReflectTest.class;
// 获取注解对象
Pro annotation = reflectTestClass.getAnnotation(Pro.class);
/*
public class ProImpl implements Pro {
String classname (){
return "hxx.Annotation.Worker"
}
String method(){
return "show"
}
}
* */
//获取classname 和 method
String classname = annotation.classname();
String method = annotation.method();

//加载classname对应的类进内存
Class aClass = Class.forName(classname);
//创建类对象
Constructor constructor = aClass.getConstructor();
Object obj = constructor.newInstance();
//获取类的方法method
Method aClassMethod = aClass.getMethod(method);
aClassMethod.invoke(obj);
}
}

案例2:利用注解对类方法进行测试

  1. 定义计算器类
1
2
3
4
5
6
7
8
9
10
11
12
13
14
15
16
17
18
19
20
21
22
public class Calculator {
@Check
public void add() {
System.out.println("1 + 0 = " + (1 + 0));
}
@Check
public void sub() {
System.out.println("1 - 0 = " + (1 - 0));
}
@Check
public void div() {
System.out.println("1 / 0 = " + (1 / 0));
}
@Check
public void mul() {
System.out.println("1 * 0 = " + (1 * 0));
}

public void show() {
System.out.println("无bug............");
}
}
  1. 定义注解
1
2
3
4
@Target({ElementType.METHOD})
@Retention(RetentionPolicy.RUNTIME)
public @interface Check {
}
  1. 解析注解进行测试
1
2
3
4
5
6
7
8
9
10
11
12
13
14
15
16
17
18
19
20
21
22
23
24
25
26
27
28
29
30
31
32
33
34
35
36
37
38
39
/*
* 简单的测试框架
* 当主方法执行时,会自动执行被检测的所有方法,判断方法是否有异常,记录在日志中
* */
public class TestCheck {
public static void main(String[] args) throws IOException {
//创建计算器对象
Calculator calculator = new Calculator();
//获取字节码文件对象
Class aClass = calculator.getClass();
//获取所有方法
Method[] methods = aClass.getMethods();
//判断方法上是否有Check注解
int num = 0;// 出现异常的次数
BufferedWriter bw = new BufferedWriter(new FileWriter("bug.txt"));
for (Method method : methods) {
if (method.isAnnotationPresent(Check.class)) {
//有,执行
try {
method.invoke(calculator);
} catch (Exception e) {
num++;
bw.write(method.getName() + "方法出异常");
bw.newLine();
bw.write("异常的名称:"+e.getCause().getClass().getSimpleName());
bw.newLine();
bw.write("异常的原因"+e.getCause().getMessage());
bw.newLine();
bw.write("---------------------------------");
bw.newLine();
}
}
}
bw.write("本次测试总共出现"+num+"次异常");
bw.flush();
bw.close();
//捕获异常,记录文件
}
}

java反射

反射

  • 反射是框架设计的灵魂

  • 框架:半成品软件。可以在框架的基础上进行软件开发,简化编码

  • 反射:将类的各个组成部分封装为其他对象,这就是反射机制

    • 可以在程序运行过程中,操作这些对象。
    • 可以解耦,提高程序的可扩展性。

Java代码的三个阶段

获取Class对象的方式

  1. Class.forname(“全类名”):将字节码文件加载进内存,返回class对象。
    • 多用于配置文件,将类名定义在配置文件中。读取文件,加载类
  2. 类名.class:通过类名的属性class获取
    • 多用于参数的传递
  3. 对象.getclass():在Object类中定义
    • 多用于对象的获取字节码的方式
  4. *注意:同一个字节码文件(.class)在一次程序运行过程中,只会被加载一次,不论通过哪一种方式获取的class对象都是同一个。**
1
2
3
4
5
6
7
8
9
10
11
12
13
14
public class ReflectDemo {
public static void main(String[] args) throws Exception {
Class aClass = Class.forName("hxx.domain.Person"); //包名.类名
System.out.println(aClass);
Class aClass1 = Person.class;
System.out.println(aClass1);
Person p = new Person();
Class aClass2 = p.getClass();
System.out.println(aClass2);
//比较三个对象
System.out.println(aClass == aClass1);// true
System.out.println(aClass == aClass2);// true
}
}

class对象功能

  • 获取成员变量
    • Field[] getfields() // 获取public修饰的成员变量
    • Field[] getfields(String name) // 获取指定名称的public修饰的成员变量
    • Field[] getDeclaredFields() // 获取所有的成员变量
    • Field[] getDeclaredFields(String name) // 获取指定名称的成员变量
    • 操作:可以设置set和获取值get
    • 暴力反射:当访问非共有成员变量时,使用setAccessiable(true)忽略访问权限修饰符的安全检查
1
2
3
4
5
6
7
8
9
10
11
12
13
14
15
16
17
18
19
20
21
22
23
24
25
26
public static void main(String[] args) throws Exception {
//获取Person的class对象
Class personClass = Person.class;

Field[] fields = personClass.getFields();
for (Field field : fields) {
System.out.println(field);
}

Person person = new Person();
Field a = personClass.getField("a");
a.set(person,10);
Object o = a.get(person);
System.out.println(o);

Field[] declaredFields = personClass.getDeclaredFields();
for (Field declaredField : declaredFields) {
System.out.println(declaredField);
}

Field d = personClass.getDeclaredField("d"); //访问了非公有成员
//忽略访问权限修饰符的安全检查
d.setAccessible(true); //暴力反射
o = d.get(person);
System.out.println(o);
}
  • 获取构造方法
    • Constructor<?>[] getConstructors()
    • Constructor < T > getConstructor(类 <?> … parameterTypes) //
    • Constructor<?>[] geDeclaredtConstructors()
    • Constructor < T > getDeclaredConstructor(类 <?> … parameterTypes)
    • 获取到构造方法来创建对象:T newInstance(Object … initargs)
1
2
3
4
5
6
7
8
9
10
11
public static void main(String[] args) throws Exception {
//获取Person的class对象
Class personClass = Person.class;
Constructor constructor = personClass.getConstructor(String.class, int.class);
System.out.println(constructor);
Object obj = constructor.newInstance("hxx", 20); // 创建对象
System.out.println(obj);

// 空参数构造方法创建对象时,使用Class对象的newInstance方法初始化对象
//Object o1 = personClass.newInstance();
}
  • 获取成员方法
    • Method<?>[] getMethods()
    • Method< T > getMethod(String name,类 <?> … parameterTypes)
    • Method<?>[] geDeclaredtMethods()
    • Method< T > getDeclaredMethodString name,(类 <?> … parameterTypes)
1
2
3
4
5
6
7
8
9
10
11
12
13
14
15
16
17
public static void main(String[] args) throws Exception {
//获取Person的class对象
Class personClass = Person.class;
Person person = new Person();
/*
* 获取成员方法,传入方法名、该方法的参数列表
* */
Method setAge = personClass.getMethod("setAge", int.class);
//执行方法,Object invoke(Object obj,Object...args)
setAge.invoke(person,10);
System.out.println(person);

Method[] methods = personClass.getMethods(); // 获取所有的public修饰的方法和该类的父类的共有方法
for (Method method : methods) {
System.out.println(method.getName()); //获取方法名
}
}
  • 获取类名
    • String getname()
1
System.out.println(personClass.getName()); //获取类名

案例

  • 需求:写一个“框架”,可以帮我们创建任意类的对象,并且执行其中任意方法

  • 实现

    • 定义两个类
    1
    2
    3
    4
    5
    6
    7
    8
    9
    10
    public class Person {
    public void eat(){
    System.out.println("person eat");
    }
    }
    public class Student {
    public void sleep(){
    System.out.println("Student sleep");
    }
    }
    • 将需要创建的对象的全类名和需要执行的方法定义在配置文件中
    1
    2
    3
    //配置文件为pro.properties
    className=hxx.domain.Student //选择类
    methodName=sleep //选择类中要执行的方法
    • 在程序中加载读取配置文件
    • 使用反射技术来加载类文件
    • 创建对象
    • 执行方法
1
2
3
4
5
6
7
8
9
10
11
12
13
14
15
16
17
18
19
20
21
22
23
24
public class ReflectTest {
public static void main(String[] args) throws Exception {
// 创建Properties对象
Properties properties = new Properties();
//加载配置文件,转换为一个集合
//获取class目录下的配置文件的字节流
ClassLoader classLoader = ReflectTest.class.getClassLoader();
InputStream is = classLoader.getResourceAsStream("pro.properties");
properties.load(is);
//获取配置文件的内容
String className = properties.getProperty("className");
String methodName = properties.getProperty("methodName");

//加载该类进内存
Class cls = Class.forName(className);
//创建类对象
//获取构造方法
Constructor constructor = cls.getConstructor();// 空参构造方法
Object obj = constructor.newInstance();
//获取方法对象
Method method = cls.getMethod(methodName);
method.invoke(obj);
}
}

Junit单元测试

Junit单元测试

  • 测试分类

    • 黑盒测试
    • 白盒测试
  • Junit使用:核心思想:调用被测方法,使用断言

    • 定义一个测试类(测试用例)

      测试类名:被测试的类名+Test

      包名:xxx.xxx.test

  • 定义测试方法:可以独立运行

    • 方法名:test+测试的方法名
    • 返回值:void
    • 参数列表:建议空参
  • 给方法加注解@Test

  • 导入Junit的依赖环境

  • @before 修饰的方法在测试方法前会自动执行

  • @After 修饰的方法在测试方法后会自动执行行

  1. 定义Calculator类
1
2
3
4
5
public class Calculator {
public int add(int a,int b) {
return a + b;
}
}
  1. 新建test包,定义CalculatorTest类,类中定义testadd方法
1
2
3
4
5
6
7
8
9
10
11
12
13
14
15
16
17
18
19
20
21
22
23
public class CalculatorTest {
@Before
public void init(){
System.out.println("init....");
}
@After
public void close(){
System.out.println("close....");
}
/*
* 测试add方法
* */
@Test
public void testadd(){
System.out.println("add....");
//创建计算器对象
Calculator cal = new Calculator();
//调用add方法
int result = cal.add(1,2);
//断言
Assert.assertEquals(3,result);
}
}